

The Battle of Britain Bunker: the World War Two site hardly anyone knows about
You may not think you have the slightest interest in how and where fighter aircraft operations, including the Battle of Britain and D Day landings, were controlled from during the Second World War. But I guarantee a visit to the Battle of Britain Bunker museum (yup, I had no idea such a thing existed either) will comprehensively change - and quite possibly blow - your mind.
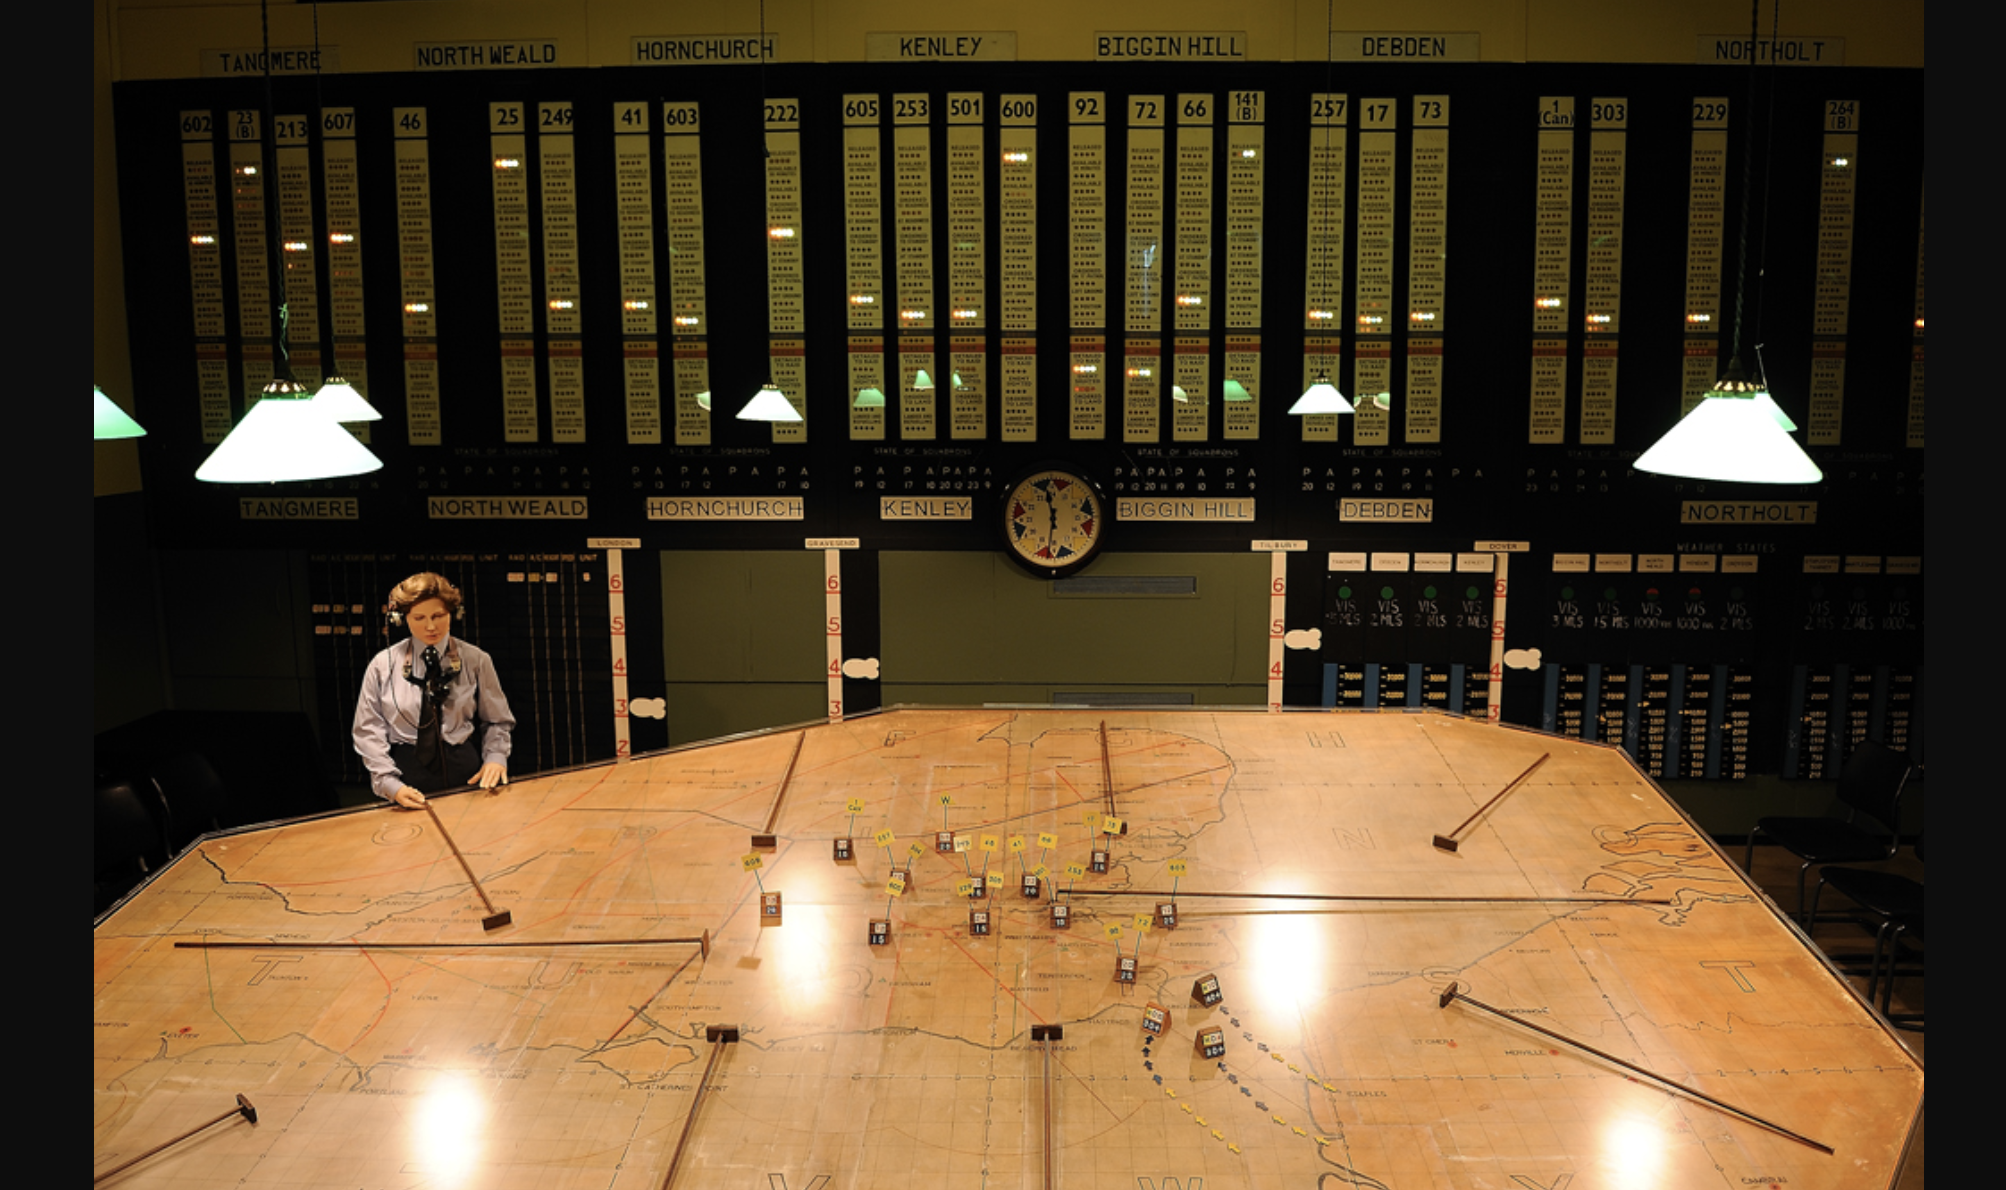
The central Operations Room in the Battle of Britain bunker
If you ever wondered where Winston Churchill was when he uttered the immortal words “Never in the field of human conflict was so much owed, by so many, to so few.” This was the place.

And if you either can’t remember, or have never known, what life was like without computers and wonder how we ever got anything done, you won’t find a more fascinating or illuminating example of how complex, sophisticated and yet at the same time almost cartoonishly simplistic the systems were that enabled us to defend the UK from invasion by the Germans.
You’ll also discover what a vital part women played in those efforts.
History as you’ve never seen it before
60 feet (18 metres) underground, buried under deep layers of concrete topped with earth, the bunker was constructed in conditions of the utmost secrecy, between February and August 1939 to house RAF Group 11 (Fighter Command) operations, and it became one of the key parts in the world’s first integrated air defence system.
Thanks to how perfectly the bunker has been preserved, you can see the large central Operations Room exactly as it looked when Churchill visited in August 1940. Behind the central map (tilted so it could be easily seen from the upstairs control room) are the wall-mounted tote boards displaying the status of all the aircraft and crews at the seven RAF bases via a system of coloured lights, whilst weather conditions at each of the sector stations are shown using coloured discs.

The status of each aircraft and crew was shown by a series of coloured lights
The location, number and direction of both enemy and friendly aircraft were plotted using numbered blocks moved around the map by Wrens using information fed to them via their headsets.

A drawing showing how the Wrens manipulated the blocks representing the different aircraft and their positions
All this intelligence was received via banks of telephones (it’s been said that the telephone engineers who kept the vital lines maintained and running throughout the war, were amongst the greatest heroes of the conflict). The room - which was manned 24/7, 365 days a year - could certainly be a busy and noisy place.

The Operations Room at full capacity
The mass of visual data was then assessed and interpreted by the on-duty Group Operations Controller who was the person ultimately responsible for making the decisions about how many fighter aircraft to scramble, which type of aircraft, which squadrons to use, when to scramble them, where to scramble them from and where to scramble them to.

The view from the Group Operations Controller position
There are so many more fascinating layers to discover about the way the bunker operations were run and how what happened there played such a key part in the defence of the country throughout the war, but I’ll leave it to you to find out what they are when you go.
There’s an excellent Visitors Centre, with all sorts of cleverly designed and enjoyable interactive displays which also features two life-size spitfire models suspended over its bright central atrium.

And when you’re done with all that, there’s a very nice cafe and the obligatory gift shop.
You can only see the bunker on one of the five, hour-long scheduled tours each day (you can go into the visitor centre any time and for however long you want, obviously) and these can get filled up so it’s best to book in advance. All the information you need, including opening hours and admission fees, is on the Battle of Britain Bunker website
Getting there
It’s true the bunker isn’t the easiest place to get to unless you’re in a car, and even then it’s somewhat tucked away in a suburban area. The nearest underground station (Uxbridge) is a mile away, but it’s a pleasant walk through Dowding Park and there is a taxi rank outside the station. Certainly its out of the way location is one of the reasons it’s as little known as it is. But if you make the effort to go - and in case you couldn’t tell, I’d really recommend you do - you’ll be more than rewarded.
Other posts you’ll enjoy
An unexpectedly uplifting outing
Discovering hidden gems wherever you live

